Water in OpenGL and GLES 2.0: Part 1 - Introduction
In an effort to bolster content on the blog I've been working on a four part article describing a water effect rendered in OpenGL, aimed mainly at games. There are a few sources on this topic already, to many of which I referred while writing the article, but I hope this particular instance will stand out in a couple of ways. Firstly this water effect is compatible with GLES 2.0, meaning it runs on a fairly wide selection of mobile devices. Secondly I wrote this specifically with the Gameplay3D framework in mind, although the techniques should be portable to other software / libraries. For those of you unaware, Gameplay3D is a cross-platform framework written in C++ with the aim of supporting the creation of games, particularly on mobile devices. It's quite mature now, actively developed by a group of professional developers at Blackberry, and is open source under the Apache 2.0 license. The main site is here, and the repository can be found on github. The 'next' branch is, in my opinion, stable enough to use and to take advantage of all the bug fixes over the current 2.0 release.
In this first part I won't go into setting up a new Gameplay project, as everything you need to know can be found on the official wiki. Instead I'll skip ahead to setting up a 3D scene within which the water effect can be developed, before outlining the general theory behind what this article is trying to achieve. I have made the full source code for the project (bar the Gameplay library itself) available on github, which is also linked at the bottom of the page. Actually implementing the effect is covered over the next three parts.
Getting Started
Assuming you have a new Gameplay project set up, you'll need to grab the article's source code from the repository. If you're developing on Windows Gameplay uses Visual Studio 2013 by default, which offers pretty decent C++11 support. I have chosen to take advantage of this in the article source code, so if you plan to compile any of the source on another platform, you will need to make sure C++11 is available. I have tested GCC 4.8 on Linux, and clang on Android and have found that they both work. If you want to use OSX or iOS then you'll have to experiment yourself, but I am led to believe C++11 is supported. Once your environment is set up and you have an empty template project, you can either replace it with the WaterSample.h and WaterSample.cpp from the source, or start developing your own alongside the article, using the source as a reference. I'll not be going through all of the code line by line, so if something appears to be missing from the explanation it is worth looking at the article source code. The repository also contains all the assets and resources used in this article, if you don't want to create your own.
Library Notes
Gameplay uses manual reference counting of shared objects so, in order to prevent memory leaks, it is important to make sure all of the objects in the code are allocated and released properly. The default Gameplay project for Visual Studio includes a DebugMem build which I highly recommend using. If any resources are not properly freed on program exit then, when using this build configuration, any reference counted objects still in memory will be reported in the debug window. The general rule of thumb is that any objects created with a Class::create() function must be freed or have their reference count updated with SAFE_DELETE or SAFE_RELEASE. Any pointers retrieved via find or get functions do not need to be updated, however.
Probably the most crucial functions in any Game derived Gameplay class are the initialise() and finalise() functions. These are where resources which live as members of the class should be created and destroyed, and is where we'll load our scene. To set up the article scene make sure that the pond.gpb and water_sample.png files from the article source are copied to somewhere in the res/ folder of your project's working directory. The pond.gpb is an optimised binary file containing two nodes making up the scene, and water_sample.png is used to texture them. You also need to make sure to copy the watersample.scene file and watersample.material file to the res/ directory as these are used to tell the framework how to load the nodes from the binary file, and how to apply the texture. You also need to copy the default set of shader files provided with Gameplay (if the setup hasn't already), or edit the material file to point to the correct directory. You can read more about configuration files on the Gameplay wiki.
Creating the Scene
The scene lives as a member of the class, m_scene and is loaded in the initialise() function with
gp::Scene::load(path/to/watersample.scene);
To avoid leaks remember to add
SAFE_RELEASE(m_scene);
to finalise(). Get used to this, as any class members created in initialise() will need to be released in finalise(). Objects local to initialise(), however, should be released with SAFE_RELEASE as soon as their usefulness is met. To be able to view the scene we will need a camera node with a camera attached to it. This camera will also allow navigation within the scene. The camera and its nodes are created in initialise():
m_cameraNode = gp::Node::create("cameraNode");
m_cameraNode->setTranslation(camStartPosition);
auto camPitchNode = gp::Node::create();
gp::Matrix m;
gp::Matrix::createLookAt(m_cameraNode->getTranslation(), gp::Vector3::zero(), gp::Vector3::unitY(), &m);
camPitchNode->rotate(m);
m_cameraNode->addChild(camPitchNode);
m_scene->addNode(m_cameraNode);
auto camera = gp::Camera::createPerspective(45.f, gp::Game::getInstance()->getAspectRatio(), 0.1f, 150.f);
camPitchNode->setCamera(camera);
m_scene->setActiveCamera(camera);
SAFE_RELEASE(camera);
SAFE_RELEASE(camPitchNode);
Notice m_cameraNode is a member variable, and so will need to be released in finalise(). camera and camPitchNode, however, only exist locally and so are released as soon as we are done modifying them. The camera makes use of two nodes; m_cameraNode allows the camera to be yawed, that is rotated around the Y axis, as well as be translated in the scene. Its child node camPitchNode is used to pitch the camera up and down.
To be able to actually see the scene on screen we need to add a call to clear() to the render() function, before visiting the scene with
m_scene->visit(this, &WaterSample::m_drawScene);
This function takes a reference to the m_drawScene() function, which it then calls on each node in the scene, the implementation of which is taken directly from the Gameplay wiki. With this added we should have the bare minimum to compile and run the project, which should display something like this (the view angle may differ depending on how your camera was initialised):
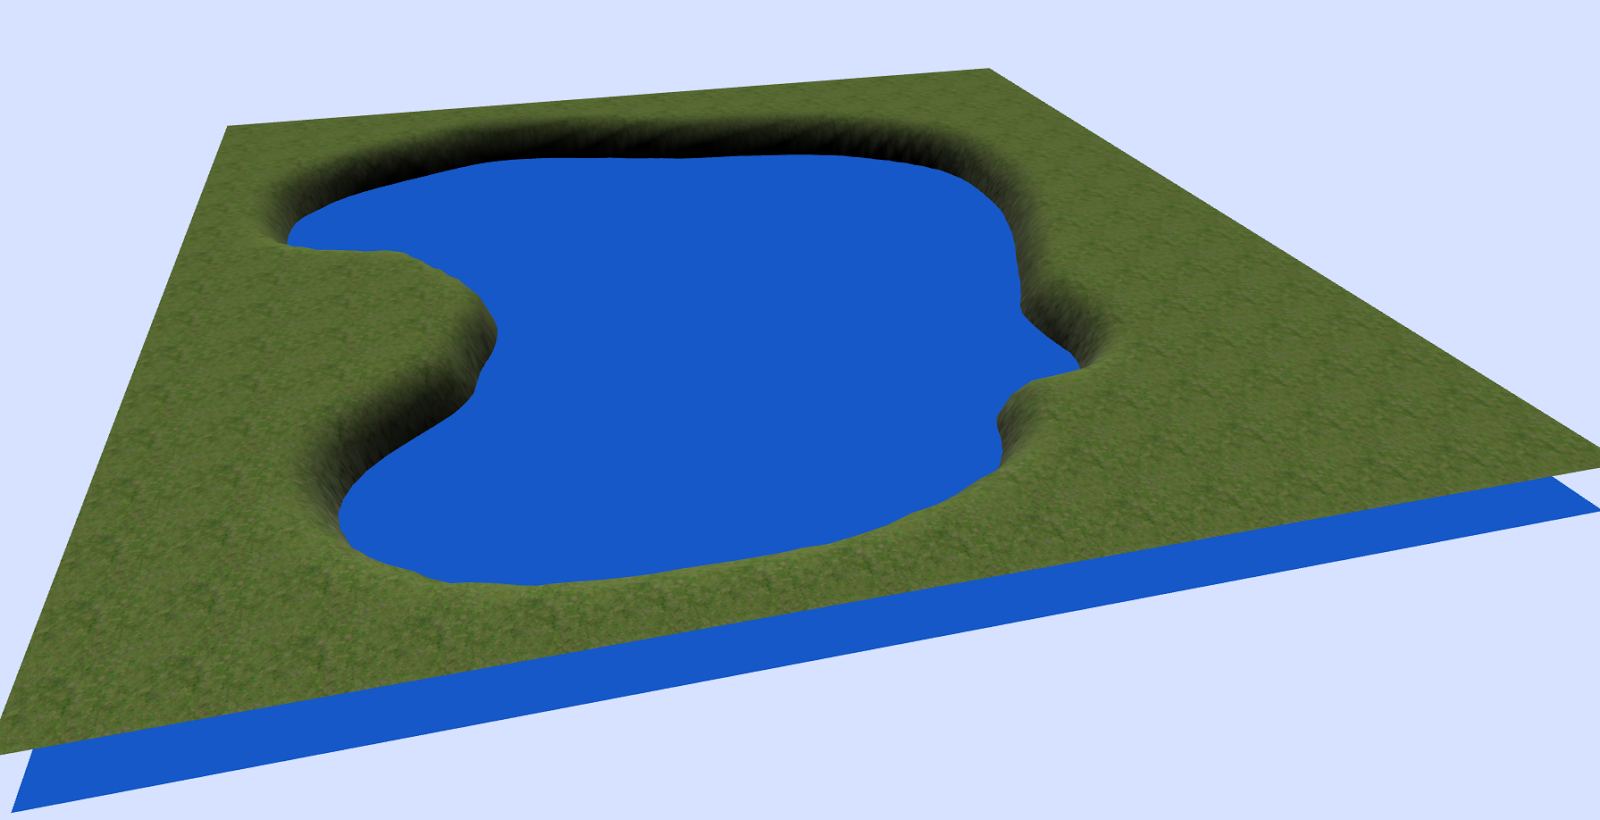 The scene contains a textured mesh, which is attached to one of the scene nodes, and a flat blue plane attached to a second node, which will eventually become the water. Unfortunately we can't yet move the camera, which would be nice to have when we look at the water later on, so let's add that first.
The Game class (from which our project is derived) also has a set of virtual functions used to handle input events. We'll override two of them, mouseEvent() and keyEvent(), and use them to rotate the camera and to modify a bitmask, m_inputMask. Then, in the update() function, we use the state of this bitmask to apply a force to m_cameraNode, moving it around the scene.
Updating the Input
First event handling:
bool WaterSample::mouseEvent(gp::Mouse::MouseEvent evt, int x, int y, int wheelDelta)
{
switch (evt)
{
case gp::Mouse::MOUSE_MOVE:
{
auto xMovement = MATH_DEG_TO_RAD(-x * mouseSpeed);
auto yMovement = MATH_DEG_TO_RAD(-y * mouseSpeed);
m_cameraNode->rotateY(xMovement);
m_cameraNode->getFirstChild()->rotateX(yMovement);
}
return true;
case gp::Mouse::MOUSE_PRESS_LEFT_BUTTON:
m_inputMask |= Button::Forward;
return true;
case gp::Mouse::MOUSE_RELEASE_LEFT_BUTTON:
m_inputMask &= ~Button::Forward;
return true;
case gp::Mouse::MOUSE_PRESS_RIGHT_BUTTON:
m_inputMask |= Button::Back;
return true;
case gp::Mouse::MOUSE_RELEASE_RIGHT_BUTTON:
m_inputMask &= ~Button::Back;
return true;
default: return false;
}
return false;
}
void WaterSample::keyEvent(gp::Keyboard::KeyEvent evt, int key)
{
if (evt == gp::Keyboard::KEY_PRESS)
{
switch (key)
{
case gp::Keyboard::KEY_ESCAPE:
exit();
break;
case gp::Keyboard::KEY_W:
case gp::Keyboard::KEY_UP_ARROW:
m_inputMask |= Button::Forward;
break;
case gp::Keyboard::KEY_S:
case gp::Keyboard::KEY_DOWN_ARROW:
m_inputMask |= Button::Back;
break;
case gp::Keyboard::KEY_A:
case gp::Keyboard::KEY_LEFT_ARROW:
m_inputMask |= Button::Left;
break;
case gp::Keyboard::KEY_D:
case gp::Keyboard::KEY_RIGHT_ARROW:
m_inputMask |= Button::Right;
break;
}
}
else if (evt == gp::Keyboard::KEY_RELEASE)
{
switch (key)
{
case gp::Keyboard::KEY_W:
case gp::Keyboard::KEY_UP_ARROW:
m_inputMask &= ~Button::Forward;
break;
case gp::Keyboard::KEY_S:
case gp::Keyboard::KEY_DOWN_ARROW:
m_inputMask &= ~Button::Back;
break;
case gp::Keyboard::KEY_A:
case gp::Keyboard::KEY_LEFT_ARROW:
m_inputMask &= ~Button::Left;
break;
case gp::Keyboard::KEY_D:
case gp::Keyboard::KEY_RIGHT_ARROW:
m_inputMask &= ~Button::Right;
break;
}
}
}
And then the update() function:
void WaterSample::update(float dt)
{
//move the camera by applying a force
gp::Vector3 force;
if (m_inputMask & Button::Forward)
force += m_cameraNode->getFirstChild()->getForwardVectorWorld();
if (m_inputMask & Button::Back)
force -= m_cameraNode->getFirstChild()->getForwardVectorWorld();
if (m_inputMask & Button::Left)
force += m_cameraNode->getRightVectorWorld();
if (m_inputMask & Button::Right)
force -= m_cameraNode->getRightVectorWorld();
if (force.lengthSquared() > 1.f) force.normalize();
m_cameraAcceleration += force / mass;
m_cameraAcceleration *= friction;
if (m_cameraAcceleration.lengthSquared() < 0.01f)
m_cameraAcceleration = gp::Vector3::zero();
m_cameraNode->translate(m_cameraAcceleration * camSpeed * (dt / 1000.f));
}
Using the forward and right vectors of the camera nodes we can calculate a direction vector in world coordinates, which is then applied as a force using Newton's second law of motion: f = ma, or force = mass * acceleration. The constant values mass and friction can be found at the top of the .cpp file in an anonymous namespace, where I prefer to group any constant values. Compile and run the scene and you should find that you can now move the camera similarly to a first person shooter, looking around with the mouse and moving using either the cursor keys or W, A, S and D.
How the Effect Works
So now that we have a scene set up and ready to get wet, let's take a moment to look at the theory behind applying the water effect. Firstly, this is purely a visual effect, no physics are involved, and, secondly, this is meant to supplement the atmosphere of a game, particularly with mobile development in mind, so there'll be no interaction with the water. It is a relatively cheap effect, and can be taken much further beyond this article as it provides the basis for more advanced effects, such as those which are seen in game engines like Source.
The effect is a multi-pass effect, composed of three scene renders per frame, two of which are done to off-screen buffers. The first render is used to create the refraction of the water. Everything in the scene above the water line is clipped and the remaining fragments rendered to a frame buffer.
 The second render is used to create the reflection. The scene is this time clipped below the water line, and also inverted vertically.
 Finally the third pass renders the two images to the screen, blending them via a special term calculated from the current view position, and distorted using a normal map to give the appearance of waves.
 While this theory is pretty general, the implementation varies between platforms, languages and even libraries. In the second part of this article I'll explain how to set up a frame buffer in Gameplay, and use it to render the refraction pass. I'll also explain about how the image is projected onto the water plane of the scene via GLES compatible shaders. In part three I'll extend this technique to render the reflection pass, and in the final part cover blending the passes, as well as improving the overall effect with some basic animation.
Part Two
References:
Eric Pacelli
Lauris Kaplinski
Riemer's XNA page
Source Code:
Github page
In this first part I won't go into setting up a new Gameplay project, as everything you need to know can be found on the official wiki. Instead I'll skip ahead to setting up a 3D scene within which the water effect can be developed, before outlining the general theory behind what this article is trying to achieve. I have made the full source code for the project (bar the Gameplay library itself) available on github, which is also linked at the bottom of the page. Actually implementing the effect is covered over the next three parts.
Getting Started
Assuming you have a new Gameplay project set up, you'll need to grab the article's source code from the repository. If you're developing on Windows Gameplay uses Visual Studio 2013 by default, which offers pretty decent C++11 support. I have chosen to take advantage of this in the article source code, so if you plan to compile any of the source on another platform, you will need to make sure C++11 is available. I have tested GCC 4.8 on Linux, and clang on Android and have found that they both work. If you want to use OSX or iOS then you'll have to experiment yourself, but I am led to believe C++11 is supported. Once your environment is set up and you have an empty template project, you can either replace it with the WaterSample.h and WaterSample.cpp from the source, or start developing your own alongside the article, using the source as a reference. I'll not be going through all of the code line by line, so if something appears to be missing from the explanation it is worth looking at the article source code. The repository also contains all the assets and resources used in this article, if you don't want to create your own.
Library Notes
Gameplay uses manual reference counting of shared objects so, in order to prevent memory leaks, it is important to make sure all of the objects in the code are allocated and released properly. The default Gameplay project for Visual Studio includes a DebugMem build which I highly recommend using. If any resources are not properly freed on program exit then, when using this build configuration, any reference counted objects still in memory will be reported in the debug window. The general rule of thumb is that any objects created with a Class::create() function must be freed or have their reference count updated with SAFE_DELETE or SAFE_RELEASE. Any pointers retrieved via find or get functions do not need to be updated, however.
Probably the most crucial functions in any Game derived Gameplay class are the initialise() and finalise() functions. These are where resources which live as members of the class should be created and destroyed, and is where we'll load our scene. To set up the article scene make sure that the pond.gpb and water_sample.png files from the article source are copied to somewhere in the res/ folder of your project's working directory. The pond.gpb is an optimised binary file containing two nodes making up the scene, and water_sample.png is used to texture them. You also need to make sure to copy the watersample.scene file and watersample.material file to the res/ directory as these are used to tell the framework how to load the nodes from the binary file, and how to apply the texture. You also need to copy the default set of shader files provided with Gameplay (if the setup hasn't already), or edit the material file to point to the correct directory. You can read more about configuration files on the Gameplay wiki.
Creating the Scene
The scene lives as a member of the class, m_scene and is loaded in the initialise() function with
gp::Scene::load(path/to/watersample.scene);
To avoid leaks remember to add
SAFE_RELEASE(m_scene);
to finalise(). Get used to this, as any class members created in initialise() will need to be released in finalise(). Objects local to initialise(), however, should be released with SAFE_RELEASE as soon as their usefulness is met. To be able to view the scene we will need a camera node with a camera attached to it. This camera will also allow navigation within the scene. The camera and its nodes are created in initialise():
m_cameraNode = gp::Node::create("cameraNode");
m_cameraNode->setTranslation(camStartPosition);
auto camPitchNode = gp::Node::create();
gp::Matrix m;
gp::Matrix::createLookAt(m_cameraNode->getTranslation(), gp::Vector3::zero(), gp::Vector3::unitY(), &m);
camPitchNode->rotate(m);
m_cameraNode->addChild(camPitchNode);
m_scene->addNode(m_cameraNode);
auto camera = gp::Camera::createPerspective(45.f, gp::Game::getInstance()->getAspectRatio(), 0.1f, 150.f);
camPitchNode->setCamera(camera);
m_scene->setActiveCamera(camera);
SAFE_RELEASE(camera);
SAFE_RELEASE(camPitchNode);
Notice m_cameraNode is a member variable, and so will need to be released in finalise(). camera and camPitchNode, however, only exist locally and so are released as soon as we are done modifying them. The camera makes use of two nodes; m_cameraNode allows the camera to be yawed, that is rotated around the Y axis, as well as be translated in the scene. Its child node camPitchNode is used to pitch the camera up and down.
To be able to actually see the scene on screen we need to add a call to clear() to the render() function, before visiting the scene with
m_scene->visit(this, &WaterSample::m_drawScene);
This function takes a reference to the m_drawScene() function, which it then calls on each node in the scene, the implementation of which is taken directly from the Gameplay wiki. With this added we should have the bare minimum to compile and run the project, which should display something like this (the view angle may differ depending on how your camera was initialised):
The Game class (from which our project is derived) also has a set of virtual functions used to handle input events. We'll override two of them, mouseEvent() and keyEvent(), and use them to rotate the camera and to modify a bitmask, m_inputMask. Then, in the update() function, we use the state of this bitmask to apply a force to m_cameraNode, moving it around the scene.
Updating the Input
First event handling:
bool WaterSample::mouseEvent(gp::Mouse::MouseEvent evt, int x, int y, int wheelDelta)
{
switch (evt)
{
case gp::Mouse::MOUSE_MOVE:
{
auto xMovement = MATH_DEG_TO_RAD(-x * mouseSpeed);
auto yMovement = MATH_DEG_TO_RAD(-y * mouseSpeed);
m_cameraNode->rotateY(xMovement);
m_cameraNode->getFirstChild()->rotateX(yMovement);
}
return true;
case gp::Mouse::MOUSE_PRESS_LEFT_BUTTON:
m_inputMask |= Button::Forward;
return true;
case gp::Mouse::MOUSE_RELEASE_LEFT_BUTTON:
m_inputMask &= ~Button::Forward;
return true;
case gp::Mouse::MOUSE_PRESS_RIGHT_BUTTON:
m_inputMask |= Button::Back;
return true;
case gp::Mouse::MOUSE_RELEASE_RIGHT_BUTTON:
m_inputMask &= ~Button::Back;
return true;
default: return false;
}
return false;
}
void WaterSample::keyEvent(gp::Keyboard::KeyEvent evt, int key)
{
if (evt == gp::Keyboard::KEY_PRESS)
{
switch (key)
{
case gp::Keyboard::KEY_ESCAPE:
exit();
break;
case gp::Keyboard::KEY_W:
case gp::Keyboard::KEY_UP_ARROW:
m_inputMask |= Button::Forward;
break;
case gp::Keyboard::KEY_S:
case gp::Keyboard::KEY_DOWN_ARROW:
m_inputMask |= Button::Back;
break;
case gp::Keyboard::KEY_A:
case gp::Keyboard::KEY_LEFT_ARROW:
m_inputMask |= Button::Left;
break;
case gp::Keyboard::KEY_D:
case gp::Keyboard::KEY_RIGHT_ARROW:
m_inputMask |= Button::Right;
break;
}
}
else if (evt == gp::Keyboard::KEY_RELEASE)
{
switch (key)
{
case gp::Keyboard::KEY_W:
case gp::Keyboard::KEY_UP_ARROW:
m_inputMask &= ~Button::Forward;
break;
case gp::Keyboard::KEY_S:
case gp::Keyboard::KEY_DOWN_ARROW:
m_inputMask &= ~Button::Back;
break;
case gp::Keyboard::KEY_A:
case gp::Keyboard::KEY_LEFT_ARROW:
m_inputMask &= ~Button::Left;
break;
case gp::Keyboard::KEY_D:
case gp::Keyboard::KEY_RIGHT_ARROW:
m_inputMask &= ~Button::Right;
break;
}
}
}
And then the update() function:
void WaterSample::update(float dt)
{
//move the camera by applying a force
gp::Vector3 force;
if (m_inputMask & Button::Forward)
force += m_cameraNode->getFirstChild()->getForwardVectorWorld();
if (m_inputMask & Button::Back)
force -= m_cameraNode->getFirstChild()->getForwardVectorWorld();
if (m_inputMask & Button::Left)
force += m_cameraNode->getRightVectorWorld();
if (m_inputMask & Button::Right)
force -= m_cameraNode->getRightVectorWorld();
if (force.lengthSquared() > 1.f) force.normalize();
m_cameraAcceleration += force / mass;
m_cameraAcceleration *= friction;
if (m_cameraAcceleration.lengthSquared() < 0.01f)
m_cameraAcceleration = gp::Vector3::zero();
m_cameraNode->translate(m_cameraAcceleration * camSpeed * (dt / 1000.f));
}
Using the forward and right vectors of the camera nodes we can calculate a direction vector in world coordinates, which is then applied as a force using Newton's second law of motion: f = ma, or force = mass * acceleration. The constant values mass and friction can be found at the top of the .cpp file in an anonymous namespace, where I prefer to group any constant values. Compile and run the scene and you should find that you can now move the camera similarly to a first person shooter, looking around with the mouse and moving using either the cursor keys or W, A, S and D.
How the Effect Works
So now that we have a scene set up and ready to get wet, let's take a moment to look at the theory behind applying the water effect. Firstly, this is purely a visual effect, no physics are involved, and, secondly, this is meant to supplement the atmosphere of a game, particularly with mobile development in mind, so there'll be no interaction with the water. It is a relatively cheap effect, and can be taken much further beyond this article as it provides the basis for more advanced effects, such as those which are seen in game engines like Source.
The effect is a multi-pass effect, composed of three scene renders per frame, two of which are done to off-screen buffers. The first render is used to create the refraction of the water. Everything in the scene above the water line is clipped and the remaining fragments rendered to a frame buffer.
Part Two
References:
Eric Pacelli
Lauris Kaplinski
Riemer's XNA page
Source Code:
Github page

Comments
Post a Comment